The Lean Product Process: #3 Creating Your Prototype
Let's start with a public service announcement: if by any chance you found this article without knowing its priors, then you should read my previous articles. I'm dissecting the four stages of lean product development. So far, we have validated our problem and proved that our solution partially or completely solves said problem.
The third stage in our product development journey will be searching for solution-product fit. As the name implies, we will look to prove that our product efficiently delivers the already validated solution.
As was the case with the previous two stages, I will use our imaginary product to illustrate the tools we can use in the build-measure-learn loop to prove solution-product fit.
If you missed out, we're developing a gadget equipped with multiple sensors attached to micromobility vehicles, such as a bike, an e-scooter or even a skateboard. When approaching an obstacle or sensing danger (motor vehicles, pedestrians, crosswalks, etc.), our gadget will emit sound and vibration alerts to keep us safe while travelling.
As I mentioned a couple of rows above, our main question is if our product will efficiently deliver the desired solution. We can break up this central question into the following assumptions:
- the product is easy to use
- users trust the product
We call these assumptions usability hypotheses.

Creating our prototype
I cautioned my readers many times before not to jump head-first into developing an actual product. But now, since we're in the solution-product fit stage, we can surely start building a product, right? Well, the answer to that question is both yes and no.
In some sense, we are building a product since it will be a tangible, visible object that we will give our users to test. But the goal still isn't to create a chiselled product that you can sell to your customers but to create a prototype with minimal functionality that you use to test your usability hypotheses. In the startup world, they call this prototype an MVP.
MVP
The term MVP, which stands for minimum viable product, was first coined by Frank Robinson in 2001 and then popularised by Steve Blank and Eric Ries. Nowadays, it's probably the most notorious jargon in the startup dictionary, known by many even outside the startup bubble. But just as popular as the term MVP is, it's just as divisive as well.
Those who paid attention to my articles about lean product development probably already noticed that I tend to avoid using the term MVP because each part of its name is easy to misinterpret. Instead, I substitute it with experiment or prototype.
First off, there's the word "product" in the name. "Product" immediately suggests we're going to build something finite, something chiselled. Since even the less experienced product teams know that building an MVP is one of the first steps in developing a product, they often skip the problem validation and problem-solution fit stages altogether.
This approach couldn't be any more wrong. The concierge experiment, which I wrote about in my previous article, could also be considered an MVP. Moreover, startup literature often calls it a concierge MVP. But as we've seen, it is an important tool of the problem-solution fit stage.
Because of the word "product", many people also find it hard to stay within the scope of an MVP and start adding functions to the MVP, which have no relation whatsoever to our value proposition or merely serve as glitter. This phenomenon is even harder to control when involving stakeholders who have no lean product development experience.
Because of the word "minimal", many commit the exact opposite and present an MVP that is way too basic. An MVP isn't equal to solving the most critical issues but representing our entire value proposition. If the MVP fails to live up to the expectations of our early adopters, we often won't get another chance to prove ourselves, and we will lose our most important means of gaining early traction.
A typical example is when an MVP delivers the expected functionality but doesn't deliver the desired user experience. For instance, if our gadget's MVP does alert us of impending danger but does this while being extremely bulky and weighing as much as a fat cat, it will miss out on the user experience factor.
In some cases, it can prove to be highly costly and time-consuming to represent our entire value proposition in a single MVP. Decreasing the size and weight of our gadget may raise our costs exponentially with each ounce saved.
In situations such as this, it's worth breaking up the value proposition into its parts. The prototype, which can be mounted to the vehicle and emits sound and vibrating alerts, may prove part of our hypothesis that it can be trusted and help travel more safely. The second part, relating to the user experience, which is how the product looks and feels and how easy it is to use, can be proven by another prototype, such as 3D renderings.
The aim of an MVP is to take (part of) our value proposition with minimal resources through the build-measure-learn loop. To avoid misunderstanding the term MVP, I will use the words prototype and experiment for the reasons mentioned above.
We can differentiate lots of prototypes. Let's see which of these can we encounter most often in the solution-product fit stage.
Low-fidelity prototypes
Building a prototype is not much different from building a house. We don't (usually) build the house first and then show it to the client. We instead start by creating floor plans to check if they like the division and functions of the interior space. Then we create 3D models to show the customers the different colours, textures and other interior design features.
Of course, the plans and visualisations have other uses as well since the contractor uses them to build the house. But this isn't different with our product either. The technical drawings and 3D models will also be used in later prototypes and to create the final product.
Building upon earlier prototypes is nothing out of the ordinary. Prototypes can and should be based on earlier prototypes. The purpose of these prototypes is to take an assumption through an iteration of the build-measure-learn loop and then change them or expand them with new functions based on the knowledge acquired to test a new set of assumptions.
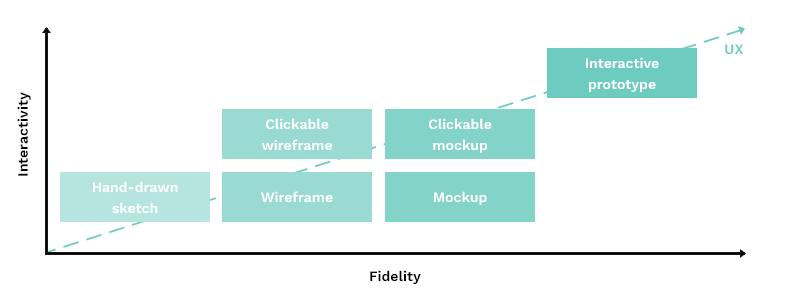
The first prototypes will be rough representations of the product. These are called low-fidelity prototypes. Later on, as we refine them, they will more closely resemble the final product. Those will be called high-fidelity prototypes.
The most basic version of a low-fidelity prototype is the paper prototype. And I don't mean something like a paper aeroplane, although if you think about it, a paper plane does prove that certain shapes exist that can keep themselves up in the air and glide forward. Instead, I mean the aforementioned technical drawings, visualisations, or assembly guides. These can all help the user visualise the look and feel of the final product.
Probably the most well-known low-fidelity prototype is the wireframe. Wireframes are black and white user interface representations made of simple lines and other geometrical shapes. They can impeccably illustrate the position and hierarchy of elements in a layout. A wireframe helps the user sense how he or she will be able to use the product.
For our gadget, we could create wireframes of the touch-screen user interface or the companion mobile app. Show these to the users, and ask for their opinion.
Of course, neither paper prototypes nor wireframes are paper-based nowadays. Instead, they are digitised, using purpose software like Balsamiq, UXPin or even Miro.
High-fidelity prototypes
As mentioned, high-fidelity prototypes are refined versions of their low-fidelity counterparts. The most frequently used high-fidelity prototype for physical products is the pocket prototype, which can be a scaled-down or a full-size representation of the product. In its final size, materials and colours, a shell of our gadget, empty on the inside, can be considered a pocket prototype. The difference between the pocket prototype and the finite product will be that the prototype won't be functional.
We can use mockups in the case of software products, such as the embedded application running on our gadget. User interface designs can be considered a mockup. These mockups can have different levels of interactivity. In their simplest form, they are not interactive at all. The UI designs are simple images.
The minimal interaction we can bestow upon our mockups is making them clickable. This means that when a user clicks certain elements, such as links or buttons, another screen floats in. Such interaction seems like a small add-on, but it is a massive step in the user's eyes, as it gives them a sense of how information flows through the software.
If we wish to represent the user experience of the final product realistically, we can up the interactivity ante. We can add animations to the mockup or show the user how they can interact with form fields (like a colour change when a field gets clicked, or the labels become red if we input an invalid value, etc.).
There is specialised software to create mockups, such as Sketch, Figma, Invision or Adobe XD. We can also use this software together.
It's always worth considering where to place our prototypes on the fidelity and interactivity scale. The deciding factor will be the ratio between the invested energy and resources versus the amount of knowledge gained. The higher the fidelity and interactivity, the more accurate the picture we'll be able to give our users of the proposed user experience, and the more relevant their feedback will be.
I prefer starting with a non-clickable wireframe and putting it through the build-measure-learn loop once. I use the experiences of this test to build a clickable mockup, which I iterate until I get the feedback that I have achieved the desired user experience. It doesn't have to be perfect, but it has to deliver the desired level.
Wizard of Oz prototype
Creating a Wizard of Oz prototype can be an exciting opportunity in the solution-product fit stage. But how does magic come into the picture, and what does product development have to do with L. Frank Baum's children's tale?
A Wizard of Oz type of prototype aims to allow users to experience the final product's full functionality and user experience. But how does that differ from the finished product then?
We will execute some functions manually with the Wizard of Oz prototype, similarly to a concierge prototype. But unlike the concierge experiment, the user won't be aware of this until the very end.
In our case, we could give the gadget to the user to mount to their vehicle and test it out. But this gadget won't have any sensors yet, doesn't give alerts, and we haven't developed any software for it yet. For the user to get the desired user experience, undercover colleagues of ours will monitor the test. When the user approaches an obstacle, they will manually deploy the audio and vibration alerts to the gadget.
Hopefully, the user won't suspect anything until we disclose our mischievous actions in the debrief interview and feedback session, just like in the story when Toto the dog pulls away the curtains to reveal that our colleague has been directing us similar to a wizard.
How to measure the effectiveness of the prototype?
By now, I have presented several prototypes. But how do we measure their success? What data can we rely on when declaring our assumption as true or false?
We could perform detailed usability tests and UX tests. These will give us invaluable empirical insights and are more often worth doing than not. But suppose, for some reason, we are unable to do these. In that case, we can always rely on the good old user interviews (in fact, usability and UX tests are a specific version of user interviews, or they are at least very connected).
We should ask our users to tell us how easy it was to use the product, their general experience using it, whether they found it safe to use (did they trust it), or if they encountered any obstacles in using it. If we receive positive feedback for all of the above questions, we can proceed to the last stage of product development, the product-market fit stage. If not, then — yes, you know it by now — we should pivot and formulate a new set of assumptions and start the solution-product validation stage anew.
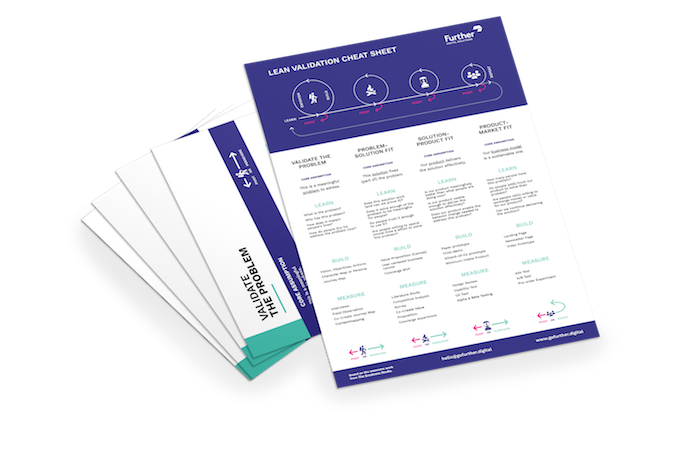
If you liked this article, download the accompanying infographic!
I want the infographic